
Since January 16, 2024, publishers and developers using Google AdMob have been required to use a Google-certified Consent Management Platform (CMP) integrated with the IAB Transparency and Consent Framework (TCF) when serving ads to users in the European Economic Area, the UK, and Switzerland. For mobile developers, this means consent handling is no longer something you can treat as an optional extra when showing ads in these regions. Before requesting ads, your app needs a reliable way to check the user’s consent status, show the appropriate consent form when required, and only continue with ad loading when allowed.
This is where Google’s User Messaging Platform (UMP) comes in. UMP provides the native Android, iOS, Unity, and Flutter SDKs for requesting consent information and displaying consent forms. With UMP now integrated into @capacitor-community/admob, Capacitor apps can handle this flow directly from TypeScript instead of requiring custom native code.
Why Consent Management Matters
To me, consent matters for two reasons. As a user I want to choose whether I can be targeted by personalized ads. As a publisher I want to respect that choice, stay compliant with privacy requirements, and give users transparency and control over their ad experience while still allowing the product to grow.
This becomes especially important when serving ads to users in the European Economic Area, the UK, and Switzerland. In these regions, privacy rules place stronger requirements on how apps collect consent, access device identifiers, and process personal data for advertising, even if your app only shows non-personalized ads. In practice, this means a mobile app needs a real consent flow, where you check whether consent is required, show the appropriate form when needed, respect the user’s choice, and only request ads when the current consent state allows it.
This post is a technical overview of using UMP with AdMob in Capacitor. The complete source code for this example is available on GitHub. It is not legal advice. If you are unsure what applies to your app, speak with a lawyer and review the official documentation:
- IAB Transparency & Consent Framework
- Google consent management requirements for publishers
- Google Privacy & messaging
What Has Changed in Capacitor AdMob
Until recently, Capacitor developers using the AdMob community plugin had to handle this part by usually writing native Android and iOS code or by avoiding the implementation entirely. I have faced this challenge myself. AdMob support was available, but implementing the latest consent flow still required native work.
After finishing the implementation for my use case, I opened a pull request, and it was accepted. With UMP now integrated, this flow can be handled directly from TypeScript, alongside the rest of the AdMob integration.
The UMP SDK helps apps manage privacy choices before ads are requested. In AdMob, you configure the privacy message you want to show to users. The SDK then requests the current consent information, presents the message when required, stores the user’s choice, and tells your app whether ads can be requested.
Recommended Consent Flow
The following example demonstrating the recommended consent flow in a small Ionic app. It follows the UMP setup described in the official Google AdMob documentation, but uses the @capacitor-community/admob plugin.
Project Dependencies
To build and run this example, you will need the following tools and dependencies:
- Node.js
- npm
- Ionic CLI
- Angular
- Capacitor
- Android Studio, Xcode and Visual Studio Code
In our package.json we include dependencies:
{
    "name": "user-messaging-platform",
    "version": "0.0.1",
    "scripts": {
        "ng": "ng",
        "start": "ng serve",
        "build": "ng build && npx cap sync",
        "watch": "ng build --watch --configuration development",
        "test": "ng test",
        "lint": "ng lint"
    },
    "private": true,
    "dependencies": {
        "@angular/animations": "^20.0.0",
        "@angular/common": "^20.0.0",
        "@angular/compiler": "^20.0.0",
        "@angular/core": "^20.0.0",
        "@angular/forms": "^20.0.0",
        "@angular/platform-browser": "^20.0.0",
        "@angular/platform-browser-dynamic": "^20.0.0",
        "@angular/router": "^20.0.0",
        "@capacitor-community/admob": "^8.0.0",
        "@capacitor/android": "8.3.2",
        "@capacitor/app": "8.1.0",
        "@capacitor/core": "8.3.2",
        "@capacitor/ios": "8.3.2",
        "@ionic/angular": "^8.0.0",
        "ionicons": "^7.0.0",
        "rxjs": "~7.8.0",
        "tslib": "^2.3.0",
        "zone.js": "~0.15.0"
    },
    "devDependencies": {
        //...
    },
    "description": "User Messaging Platform Quickstart"
}
Configure the AdMob app ID
Next step is to add your AdMob app Id into Android Manifest and iOS Info files. Without AdMob app Id your application may fail to start. Please note that we are using only a sample application id intended for testing.
<?xml version="1.0" encoding="utf-8"?>
<manifest xmlns:android="http://schemas.android.com/apk/res/android">

    <application
        android:allowBackup="true"
        android:icon="@mipmap/ic_launcher"
        android:label="@string/app_name"
        android:roundIcon="@mipmap/ic_launcher_round"
        android:supportsRtl="true"
        android:theme="@style/AppTheme">

      <meta-data
        android:name="com.google.android.gms.ads.APPLICATION_ID"
        android:value="ca-app-pub-3940256099942544~3347511713"/>

        <!-- Activities -->
    </application>

    <!-- Permissions -->
    <uses-permission android:name="android.permission.INTERNET" />
</manifest>
<?xml version="1.0" encoding="UTF-8"?>
<!DOCTYPE plist PUBLIC "-//Apple//DTD PLIST 1.0//EN" "http://www.apple.com/DTDs/PropertyList-1.0.dtd">
<plist version="1.0">
<dict>
	<key>GADIsAdManagerApp</key>
	<true/>
	<key>GADApplicationIdentifier</key>
	<string>ca-app-pub-3940256099942544~1458002511</string>
	<key>SKAdNetworkItems</key>
	<array>

	</array>
	<!-- Other configurations -->
</dict>
</plist>
For the full list of SKAdNetworkItems refer to the official guide.
Understand the Core Functions
Initialize the SDK
Before requesting consent or loading ads, we have to initialize Google Mobile Ads SDK.
AdMob.initialize();This method initializes the SDK, this needs to be done only once, ideally at app launch.
Request Consent Info
Next step is to load the consent status for the user. Here you can also set any request-specific flags, but as this is only a quick start it is out of scope.
const consentInfo = await AdMob.requestConsentInfo();requestConsentInfo() contains the following properties:
status
Represents the current consent status for the user.
Possible values:
- NOT_REQUIRED — returned for users outside the EEA, UK, and Switzerland
- OBTAINED — consent has already been gathered
- REQUIRED — the consent or privacy options form must be shown
- UNKNOWN — the status is not yet known and should be refreshed
isConsentFormAvailable
Indicates whether a consent form is available for the current user.
canRequestAds
Indicates whether ads can be requested. This value remains false until consent info has been requested and the SDK determines that ads may be loaded.
privacyOptionsRequirementStatus
Indicates whether the user must be offered privacy options.
Show Consent Form
After you have received the most up-to-date consent status, call showConsentForm() to load any forms required to collect user consent. After loading, the forms present immediately.
AdMob.showConsentForm()If the privacy message form is not required, the consent form is not displayed to the user. This operation is also asynchronous and returns a Promise with updated properties from requestConsentInfo.
Show Privacy Options Form
You should always check if the privacyOptionsRequirementStatus is required. If yes add a button or any UI component which will present the privacy option form. This way you let users manage their privacy options at any time.
AdMob.showPrivacyOptionsForm()Flow Component
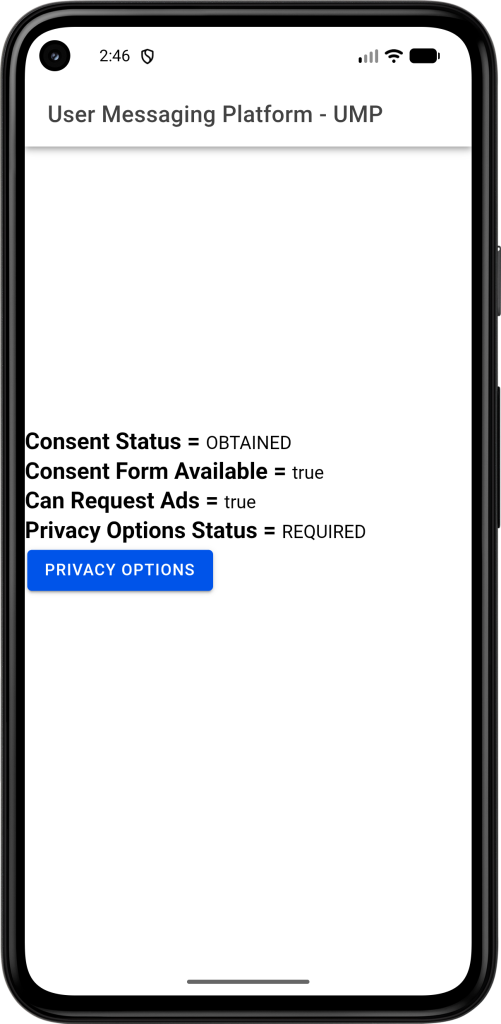
In the flow component below, the app initializes the SDK, refreshes the latest consent information, shows the consent form only when needed, and exposes the current consent state in the UI:
@Component({
    selector: 'app-home',
    template:`
    <ion-header [translucent]="true">
        <ion-toolbar>
            <ion-title>User Messaging Platform - UMP</ion-title>
        </ion-toolbar>
    </ion-header>

    <ion-content [fullscreen]="true">

        <div class="container">
            <div><strong>Consent Status = </strong>{{ status }}</div>
            <div><strong>Consent Form Available = </strong>{{ isConsentFormAvailable }}</div>
            <div><strong>Can Request Ads = </strong>{{ canRequestAds }}</div>
            <div><strong>Privacy Options Status = </strong>{{ privacyOptionsRequirementStatus }}</div>
            <div><ion-button (click)="showPrivacyOptionsForm()">Privacy Options</ion-button></div>
        </div>
    </ion-content>`,
    styleUrls: ['home.page.scss'],
    imports: [IonButton, IonHeader, IonToolbar, IonTitle, IonContent],
})
export class HomePage implements OnInit {

    status?: AdmobConsentStatus;
    isConsentFormAvailable?: boolean;
    canRequestAds?: boolean;
    privacyOptionsRequirementStatus?: PrivacyOptionsRequirementStatus;

    async ngOnInit() {
        await AdMob.initialize({ initializeForTesting: !environment.production });
        let consentInfo = await AdMob.requestConsentInfo();

        this.status = consentInfo.status;
        this.isConsentFormAvailable = consentInfo.isConsentFormAvailable;
        this.canRequestAds = consentInfo.canRequestAds;
        this.privacyOptionsRequirementStatus = consentInfo.privacyOptionsRequirementStatus;

        consentInfo = await AdMob.showConsentForm();
        this.status = consentInfo.status;
        this.canRequestAds = consentInfo.canRequestAds;
        this.privacyOptionsRequirementStatus = consentInfo.privacyOptionsRequirementStatus;
    }

    showPrivacyOptionsForm() {
        AdMob.showPrivacyOptionsForm();
    }
}Consent Flow on Android and iOS
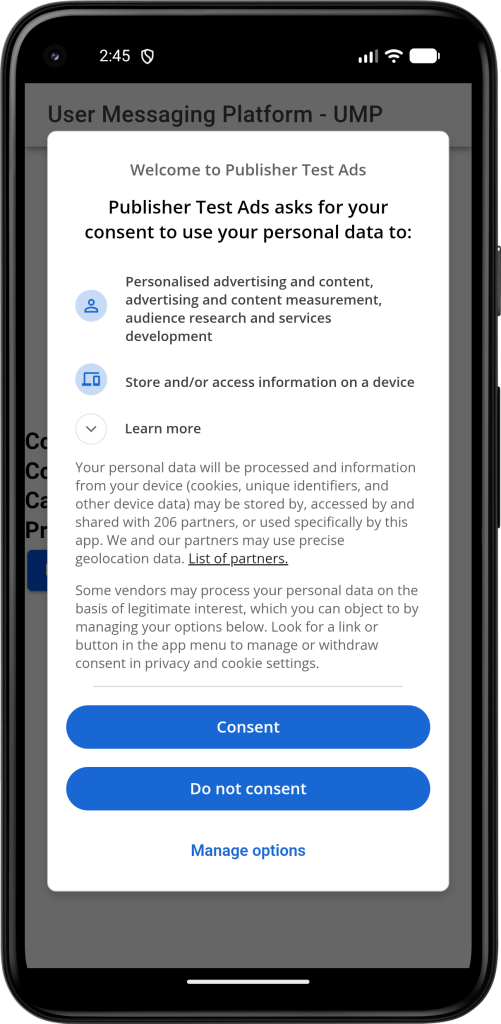
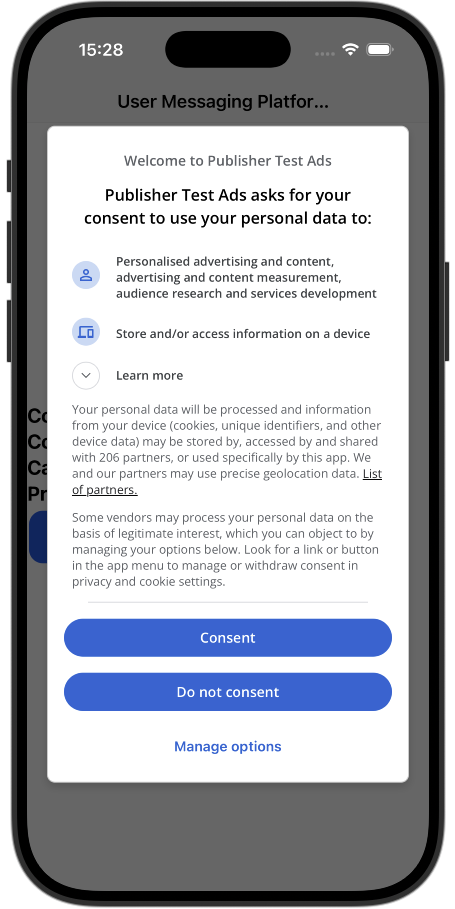
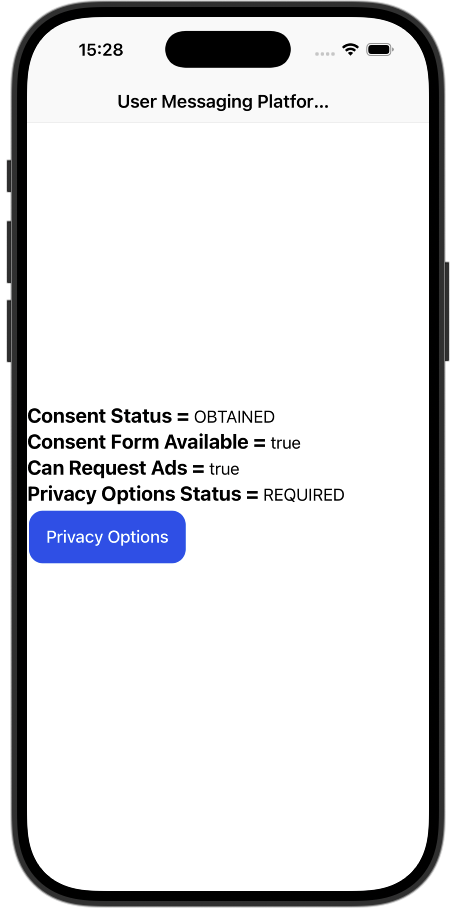
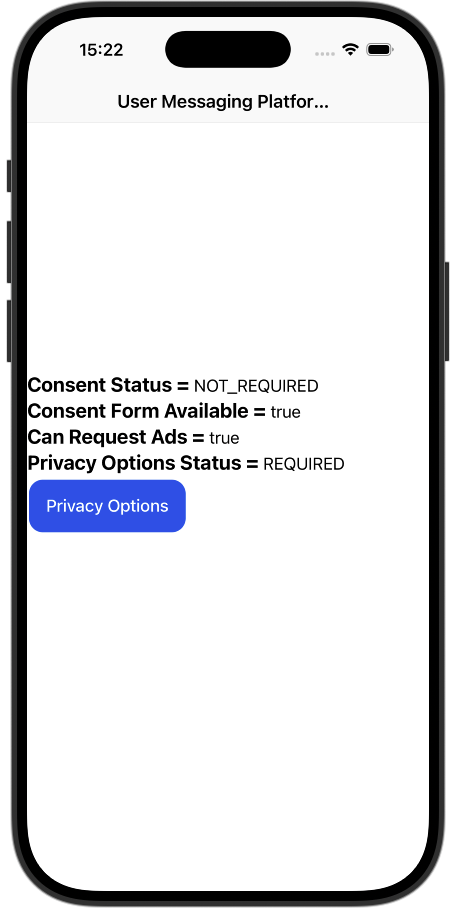
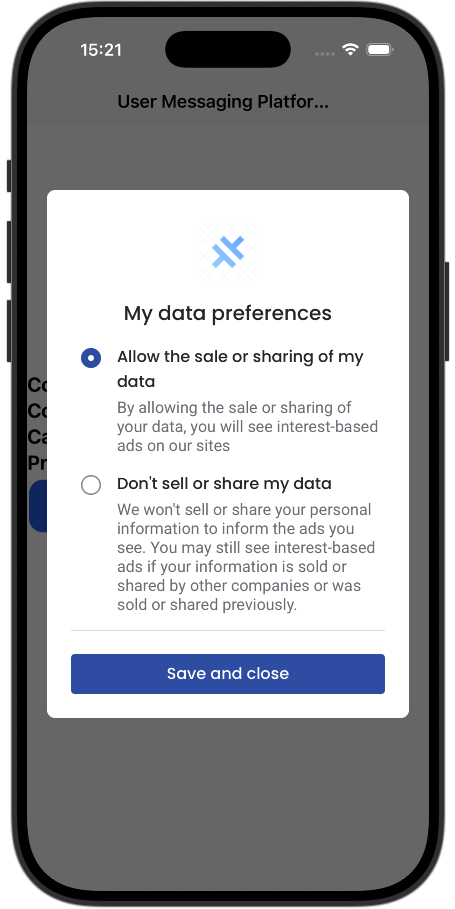
It is useful to see how the consent flow behaves on real devices. Screenshots below show the same implementation running on Android and iOS with different debug geography settings and privacy message states.
Consent Required
When consent is required, UMP presents the privacy message configured in AdMob.
Debug Geography
On test devices you can force geography, which can be used to simulate users from different regions.
AdMob.requestConsentInfo({ debugGeography: AdmobConsentDebugGeography.US });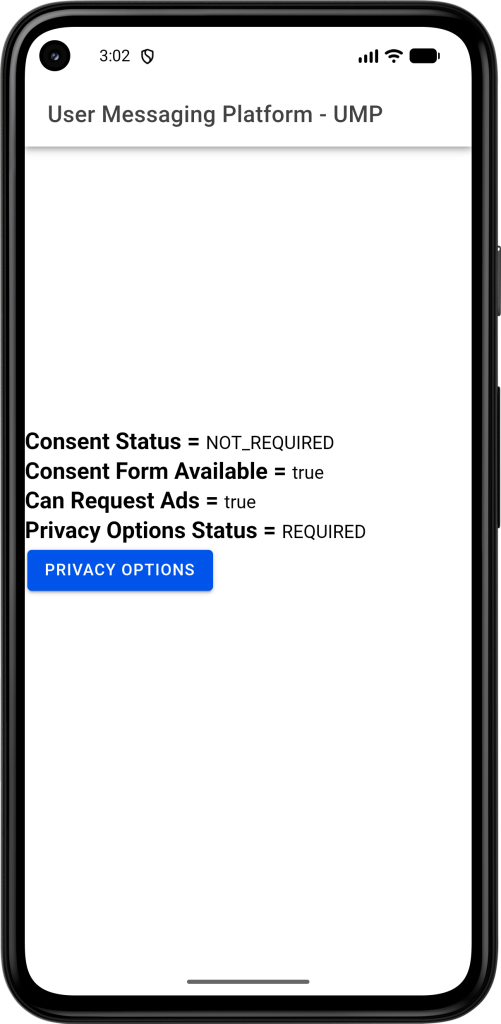

Testing The Consent Flow
When testing Capacitor plugins it is a best practice to use mocks. With mocks, we wrap the AdMob behavior into JavaScript proxy call. To use mocks we need to create AdMob proxy object in __mocks__/@capacitor-community/admob.ts.
export const AdMob = {
    async initialize(options?: AdMobInitializationOptions): Promise<void> {
        return Promise.resolve();
    },

    async requestConsentInfo(): Promise<AdmobConsentInfo> {
        return Promise.resolve({
            status: RealAdmobConsentStatus.REQUIRED,
            isConsentFormAvailable: true,
            canRequestAds: false,
            privacyOptionsRequirementStatus: PrivacyOptionsRequirementStatus.REQUIRED
        });
    },

    async showConsentForm(): Promise<AdmobConsentInfo> {
        return Promise.resolve({
            status: RealAdmobConsentStatus.OBTAINED,
            canRequestAds: true,
            privacyOptionsRequirementStatus: PrivacyOptionsRequirementStatus.REQUIRED
        });
    },

    async showPrivacyOptionsForm(): Promise<void> {
        return Promise.resolve();
    }
};

export const AdmobConsentStatus = RealAdmobConsentStatus;
export type AdmobConsentStatus = RealAdmobConsentStatus;

export const AdmobConsentDebugGeography = RealAdmobConsentDebugGeography;
export type AdmobConsentDebugGeography = RealAdmobConsentDebugGeography;
Mocking Capacitor Plugins
Next, we configure path mapping for the test environment so imports from @capacitor-community/admob resolve to our mock implementation during unit tests.
{
    "extends": "./tsconfig.json",
    "compilerOptions": {
        "outDir": "./out-tsc/spec",
        "types": [ "jasmine" ],
        "paths": {
            "@capacitor-community/*": [ "__mocks__/@capacitor-community/*" ]
        }
    },
    "files": [ "src/test.ts", "src/polyfills.ts" ],
    "include": [ "src/**/*.spec.ts", "src/**/*.d.ts" ]
}With the plugin mocked, the component test can focus on our own consent-flow logic.
describe('HomePage', () => {
    let component: HomePage;
    let fixture: ComponentFixture<HomePage>;

    beforeEach(async () => {
        await TestBed.configureTestingModule({
            imports: [HomePage],
        }).compileComponents();

        fixture = TestBed.createComponent(HomePage);
        component = fixture.componentInstance;
    });

    it('should create', () => {
        expect(component).toBeTruthy();
    });

    it('should handle consent form during init', async () => {
        await component.ngOnInit();
        expect(component.status).toBe(AdmobConsentStatus.OBTAINED);
        expect(component.canRequestAds).toBeTrue();
        expect(component.isConsentFormAvailable).toBeTrue();
        expect(component.privacyOptionsRequirementStatus).toBe(PrivacyOptionsRequirementStatus.REQUIRED);
    });
});
This test does not validate the native UMP implementation itself. That part belongs to Google’s SDK and the Capacitor plugin. What we are testing here is our own application logic.
Conclusion
In this post, we walked through how to use Google’s User Messaging Platform with AdMob in a Capacitor application through the @capacitor-community/admob plugin. The main goal was to show how consent handling can now be implemented directly from TypeScript, without writing custom native Android or iOS plugins.
This does not replace legal review or proper AdMob configuration, but it gives Capacitor developers a practical starting point for building a consent-aware ad flow. The native UMP implementation is still handled by Google’s SDKs, while your application can stay focused on when to request consent, when to show forms, and when it is safe to load ads.
You can find the complete source code in the GitHub repository. Make sure to test the flow on real Android and iOS devices and verify that your privacy messages are configured correctly in AdMob before publishing.
Leave a Reply